Automate Jira to GitHub Copilot
Coding agents can significantly speed up development, but crucial engineering context often gets lost in the process. In this guide, we will learn how to create an AI agent that not only automates the generation of GitHub issues from Jira tickets but also ensures that important context is preserved by assigning them to GitHub Copilot and linking pull requests back to Jira. This setup will help us establish a seamless ticket-to-deployment workflow, bridging the gap between Jira and GitHub.

Common use cases
- Auto-create PRs for bug fixes to minimize manual work.
- Integrate with Copilot for teams not relying on GitHub Issues.
- Link Jira tickets to PRs to improve cross-platform collaboration.
- Generate GitHub issues from Jira for faster prototyping.
Prerequisites
This guide assumes the following:
- You have a Port account and have completed the onboarding process.
- Port's GitHub app is installed in your account.
- Port's Jira integration is installed in your account.
- You have access to create and configure AI agents in Port.
- You have completed the setup in the Trigger GitHub Copilot from Port guide, ensuring that Copilot will be automatically assigned to any GitHub issues created through this guide.
While this guide uses GitHub and Jira, you can adapt it for other Git providers like GitLab or Azure DevOps, and other project management tools like Linear.
This guide demonstrates using GitHub Copilot, but you can also use other coding agents like Claude Code, Devin, etc., to achieve similar automation and integration.
Set up data model
We will configure the necessary blueprints to support our AI-enhanced coding workflow. This involves updating the Jira issue blueprint with necessary relations.
Update Jira issue blueprint
When you install Port's Jira integration, the Jira project and issue blueprints are created by default. However, we need to update the Jira issue blueprint to add the pull request relation and create a mirror property for the PR link.
-
Go to the builder page of your portal.
-
Find and select your existing Jira issue blueprint (e.g.,
jiraIssue). -
Click on
{...} Edit JSON. -
Add the following relation to the
relationssection:Pull request relation (Click to expand)
"pull_request": {
  "target": "githubPullRequest",
  "required": false,
  "many": false
} -
Add the following mirror property to the
mirrorPropertiessection:Pull request link mirror property (Click to expand)
"pull_request_link": {
  "title": "Pull Request Link",
  "path": "pull_request.link"
} -
Click
Saveto update the blueprint.
Update Jira integration configuration
Now we need to update the Jira integration configuration mapping to establish the relationship between Jira issues and pull requests. The mapping will check if the pull request title contains the Jira issue key.
-
Go to the data sources page of your portal.
-
Find your Jira integration and click on it.
-
Go to the
Mappingtab. -
Add the following YAML block into the editor to map the pull request relation:
Updated Jira integration configuration (Click to expand)
resources:
  - kind: issue
    selector:
      query: 'true'
      jql: >-
        ((statusCategory != Done) OR (created >= -1w) OR (updated >= -1w))
    port:
      entity:
        mappings:
          identifier: .key
          title: .fields.summary
          blueprint: '"jiraIssue"'
          properties:
            url: (.self | split("/") | .[:3] | join("/")) + "/browse/" + .key
            status: .fields.status.name
            issueType: .fields.issuetype.name
            components: .fields.components
            description: >-
              [.fields.description.content[]?.content[]?.text // empty] |
              join("\n")
            creator: .fields.creator.emailAddress
            priority: .fields.priority.name
            labels: .fields.labels
            created: .fields.created
            updated: .fields.updated
            resolutionDate: .fields.resolutiondate
          relations:
            project: .fields.project.key
            parentIssue: .fields.parent.key
            subtasks: .fields.subtasks | map(.key)
            jira_user_assignee: .fields.assignee.accountId
            jira_user_reporter: .fields.reporter.accountId
            assignee:
              combinator: '"or"'
              rules:
                - property: '"jira_user_id"'
                  operator: '"="'
                  value: .fields.assignee.accountId // ""
                - property: '"$identifier"'
                  operator: '"="'
                  value: .fields.assignee.email // ""
            reporter:
              combinator: '"or"'
              rules:
                - property: '"jira_user_id"'
                  operator: '"="'
                  value: .fields.reporter.accountId // ""
                - property: '"$identifier"'
                  operator: '"="'
                  value: .fields.reporter.email // ""
            repository:
              combinator: '"and"'
              rules:
                - property: '"$identifier"'
                  operator: '"="'
                  value: .fields.customfield_10039.value
            pull_request:
              combinator: '"and"'
              rules:
                - property: '"$title"'
                  operator: '"contains"'
value: .key -
Click
Saveto update the integration configuration.
Update GitHub Integration Mapping
To track pull requests opened by Copilot that are meant to fix Jira issues, we need to update the GitHub integration mapping. This will allow us to establish a connection between the pull request and the corresponding Jira issue using the Jira issue key included in the PR title.
-
Go to the builder page of your portal.
-
Find and select your existing GitHub integration configuration.
-
Click on
{...} Edit JSON. -
Add the following mapping to the
mappingssection:Pull request mapping (Click to expand)
- kind: pull-request
  selector:
    query: ((.title // "") | test("[A-Z]+-[0-9]+")) and (.user.login == "Copilot")
  port:
    entity:
      mappings:
        identifier: (.title // "") | match("[A-Z]+-[0-9]+").string
        blueprint: '"jiraIssue"'
        properties: {}
        relations:
pull_request: .id|tostring -
Click
Saveto update the integration configuration.
Create AI agent
Next, we will create an AI agent that generates GitHub issues from Jira tickets with appropriate context and labels.
Configure the GitHub issue creation AI agent
-
Go to the AI Agents page of your portal.
-
Click on
+ AI Agent. -
Toggle
Json modeon. -
Copy and paste the following JSON schema:
GitHub issue creation AI agent configuration (Click to expand)
{
  "identifier": "github_issue_creation",
  "title": "Github Issue Creation",
  "icon": "Details",
  "team": [],
  "properties": {
    "description": "Creates Github issues from Jira tickets",
    "status": "active",
    "allowed_blueprints": [
      "service",
      "githubIssue",
      "githubRepository",
      "_user",
      "_team"
    ],
    "allowed_actions": [
      "create_github_issue"
    ],
    "prompt": "Create a GitHub issue that builds on the context of a linked Jira ticket.\n\nThe GitHub issue should:\n1.\tSummarize and clearly explain the task, using the Jira description as a base.\n2.\tAugment the description with relevant insights from the repository — such as the README, setup or contribution instructions, existing issues, or implementation notes — to make the issue fully self-contained.\n3.\tThe **issue title MUST start with the Jira ticket key**, using the format: `<Jira-Ticket-ID> - <what needs to be done>` (e.g., `JIRA-1234 - Add missing lint configuration`). This ensures PRs created by Copilot are linkable back to Jira.\n4.\tAdd GitHub labels, including one with the Jira ticket key (e.g., `JIRA-1234`), and any additional relevant labels (e.g., bug, enhancement, infra).\n5.\tAlso include a label named `auto_assign` in all creations.\n6. The GitHub issue body should end with the following directive:\n🚨 **IMPORTANT NOTE FOR COPILOT**: When creating the pull request to resolve this issue:\n    1. You **must ALWAY include the Jira ticket ID** (e.g., `JIRA-1234`) in the **PR title**.\n    2. Do **not** rename the PR title or remove the Jira ticket reference.\n    3. Add GitHub labels with the Jira ticket key (e.g., `JIRA-1234`) to the PR.\n\nIf no direct match can be confidently made (e.g., across multiple repos), make a best guess, and clearly state any assumptions in the issue body.",
    "execution_mode": "Automatic",
    "conversation_starters": []
  },
  "relations": {}
} -
Click
Createto save the agent.
The more integrations and data you add to the agent, the richer the context it will provide to the Copilot agent. Consider integrating additional data sources like deployment history, related incidents, and more to enhance the AI agent's effectiveness.
Set up automations
We will create two automations to orchestrate the AI-enhanced release management workflow:
- Trigger the AI agent when Jira tickets move to "In Progress" with "copilot" label
- Update Jira tickets with pull request links
Automation to trigger AI agent
This automation can be configured to trigger based on various criteria. Currently, it triggers based on a label, but you can also set it to trigger based on different properties or ownership.
-
Go to the automations page of your portal.
-
Click on
+ Automation. -
Copy and paste the following JSON schema:
Create GitHub issue from Jira automation (Click to expand)
{
  "identifier": "create_github_issue_from_jira",
  "title": "Create a Github Issue from Jira Ticket",
  "description": "When Jira issue moves to In Progress with Copilot label, create a Github issue",
  "icon": "Github",
  "trigger": {
    "type": "automation",
    "event": {
      "type": "ENTITY_UPDATED",
      "blueprintIdentifier": "jiraIssue"
    },
    "condition": {
      "type": "JQ",
      "expressions": [
        ".diff.after.properties.status == \"In Progress\"",
        ".diff.before.properties.status == \"To Do\"",
        "(.diff.after.properties.labels | index(\"copilot\")) != null"
      ],
      "combinator": "and"
    }
  },
  "invocationMethod": {
    "type": "WEBHOOK",
    "url": "https://api.getport.io/v1/agent/github_issue_creation/invoke",
    "agent": false,
    "synchronized": true,
    "method": "POST",
    "headers": {
      "RUN_ID": "{{ .run.id }}",
      "Content-Type": "application/json"
    },
    "body": {
      "prompt": "Jira Task title: \"{{.event.diff.after.title}}\"\n. Jira Task identifier: \"{{.event.diff.after.identifier}}\"\n Jira Task description: \"{{.event.diff.after.properties.description}}\"\nRepository:{{.event.diff.after.relations.repository}}.",
      "labels": {
        "source": "create_github_issue_automation",
        "jira_issue_id": "{{ .event.diff.after.identifier }}"
      }
    }
  },
  "publish": true
} -
Click
Createto save the automation.
Automation to add PR link to Jira ticket
This automation ensures that any new pull request related to a Jira ticket is promptly linked back to the ticket, providing clear traceability and context for development progress.
Follow the steps below to configure the automation:
Add Port secrets
To add these secrets to your portal:
-
Click on the
...button in the top right corner of your Port application. -
Click on Credentials.
-
Click on the
Secretstab. -
Click on
+ Secretand add the following secret:-
JIRA_AUTH_TOKEN- Base64 encoded string of your Jira credentials. Generate this by running:echo -n "your-email@domain.com:your-api-token" | base64Replace
your-email@domain.comwith your Jira email andyour-api-tokenwith your Jira API token.One time generationThe base64 encoded string only needs to be generated once and will work for all webhook calls until you change your API token.
-
Automation backend
-
Go back to the automations page of your portal.
-
Click on
+ Automation. -
Copy and paste the following JSON schema:
Add PR link to Jira issue automation (Click to expand)
Atlassian domain replacementRemember to replace
<YOUR_ATLASSIAN_DOMAIN>with your actual Atlassian domain.{
"identifier": "add_pr_link_to_jira_issue",
"title": "Add PR Link to Jira Issue",
"description": "An automation that adds the PR link to the Jira issue as a comment",
"icon": "GitPullRequest",
"trigger": {
"type": "automation",
"event": {
"type": "ENTITY_UPDATED",
"blueprintIdentifier": "jiraIssue"
},
"condition": {
"type": "JQ",
"expressions": [
".diff.after.relations.pull_request != .diff.before.relations.pull_request"
],
"combinator": "and"
}
},
"invocationMethod": {
"type": "WEBHOOK",
"url": "https://<YOUR_ATLASSIAN_DOMAIN>.atlassian.net/rest/api/3/issue/{{ .event.diff.before.identifier }}/comment",
"agent": false,
"synchronized": true,
"method": "POST",
"headers": {
"RUN_ID": "{{ .run.id }}",
"Authorization": "Basic {{ .secrets.JIRA_AUTH_TOKEN }}",
"Content-Type": "application/json"
},
"body": {
"body": {
"type": "doc",
"version": 1,
"content": [
{
"type": "paragraph",
"content": [
{
"type": "text",
"text": "Port opened a PR for this issue. Find the link below:"
}
]
},
{
"type": "paragraph",
"content": [
{
"type": "text",
"text": "View Pull Request",
"marks": [
{
"type": "link",
"attrs": {
"href": "{{ .event.diff.after.properties.pull_request_link }}"
}
},
{
"type": "strong"
}
]
}
]
}
]
}
}
},
"publish": true
} -
Click
Createto save the automation.
Test the workflow
Now let us test the complete workflow to ensure everything works correctly.
Trigger a test Jira ticket update
- Go to your Jira instance and find a test ticket.
- Add the "copilot" label to the ticket.
- Move the ticket status from "To Do" to "In Progress".
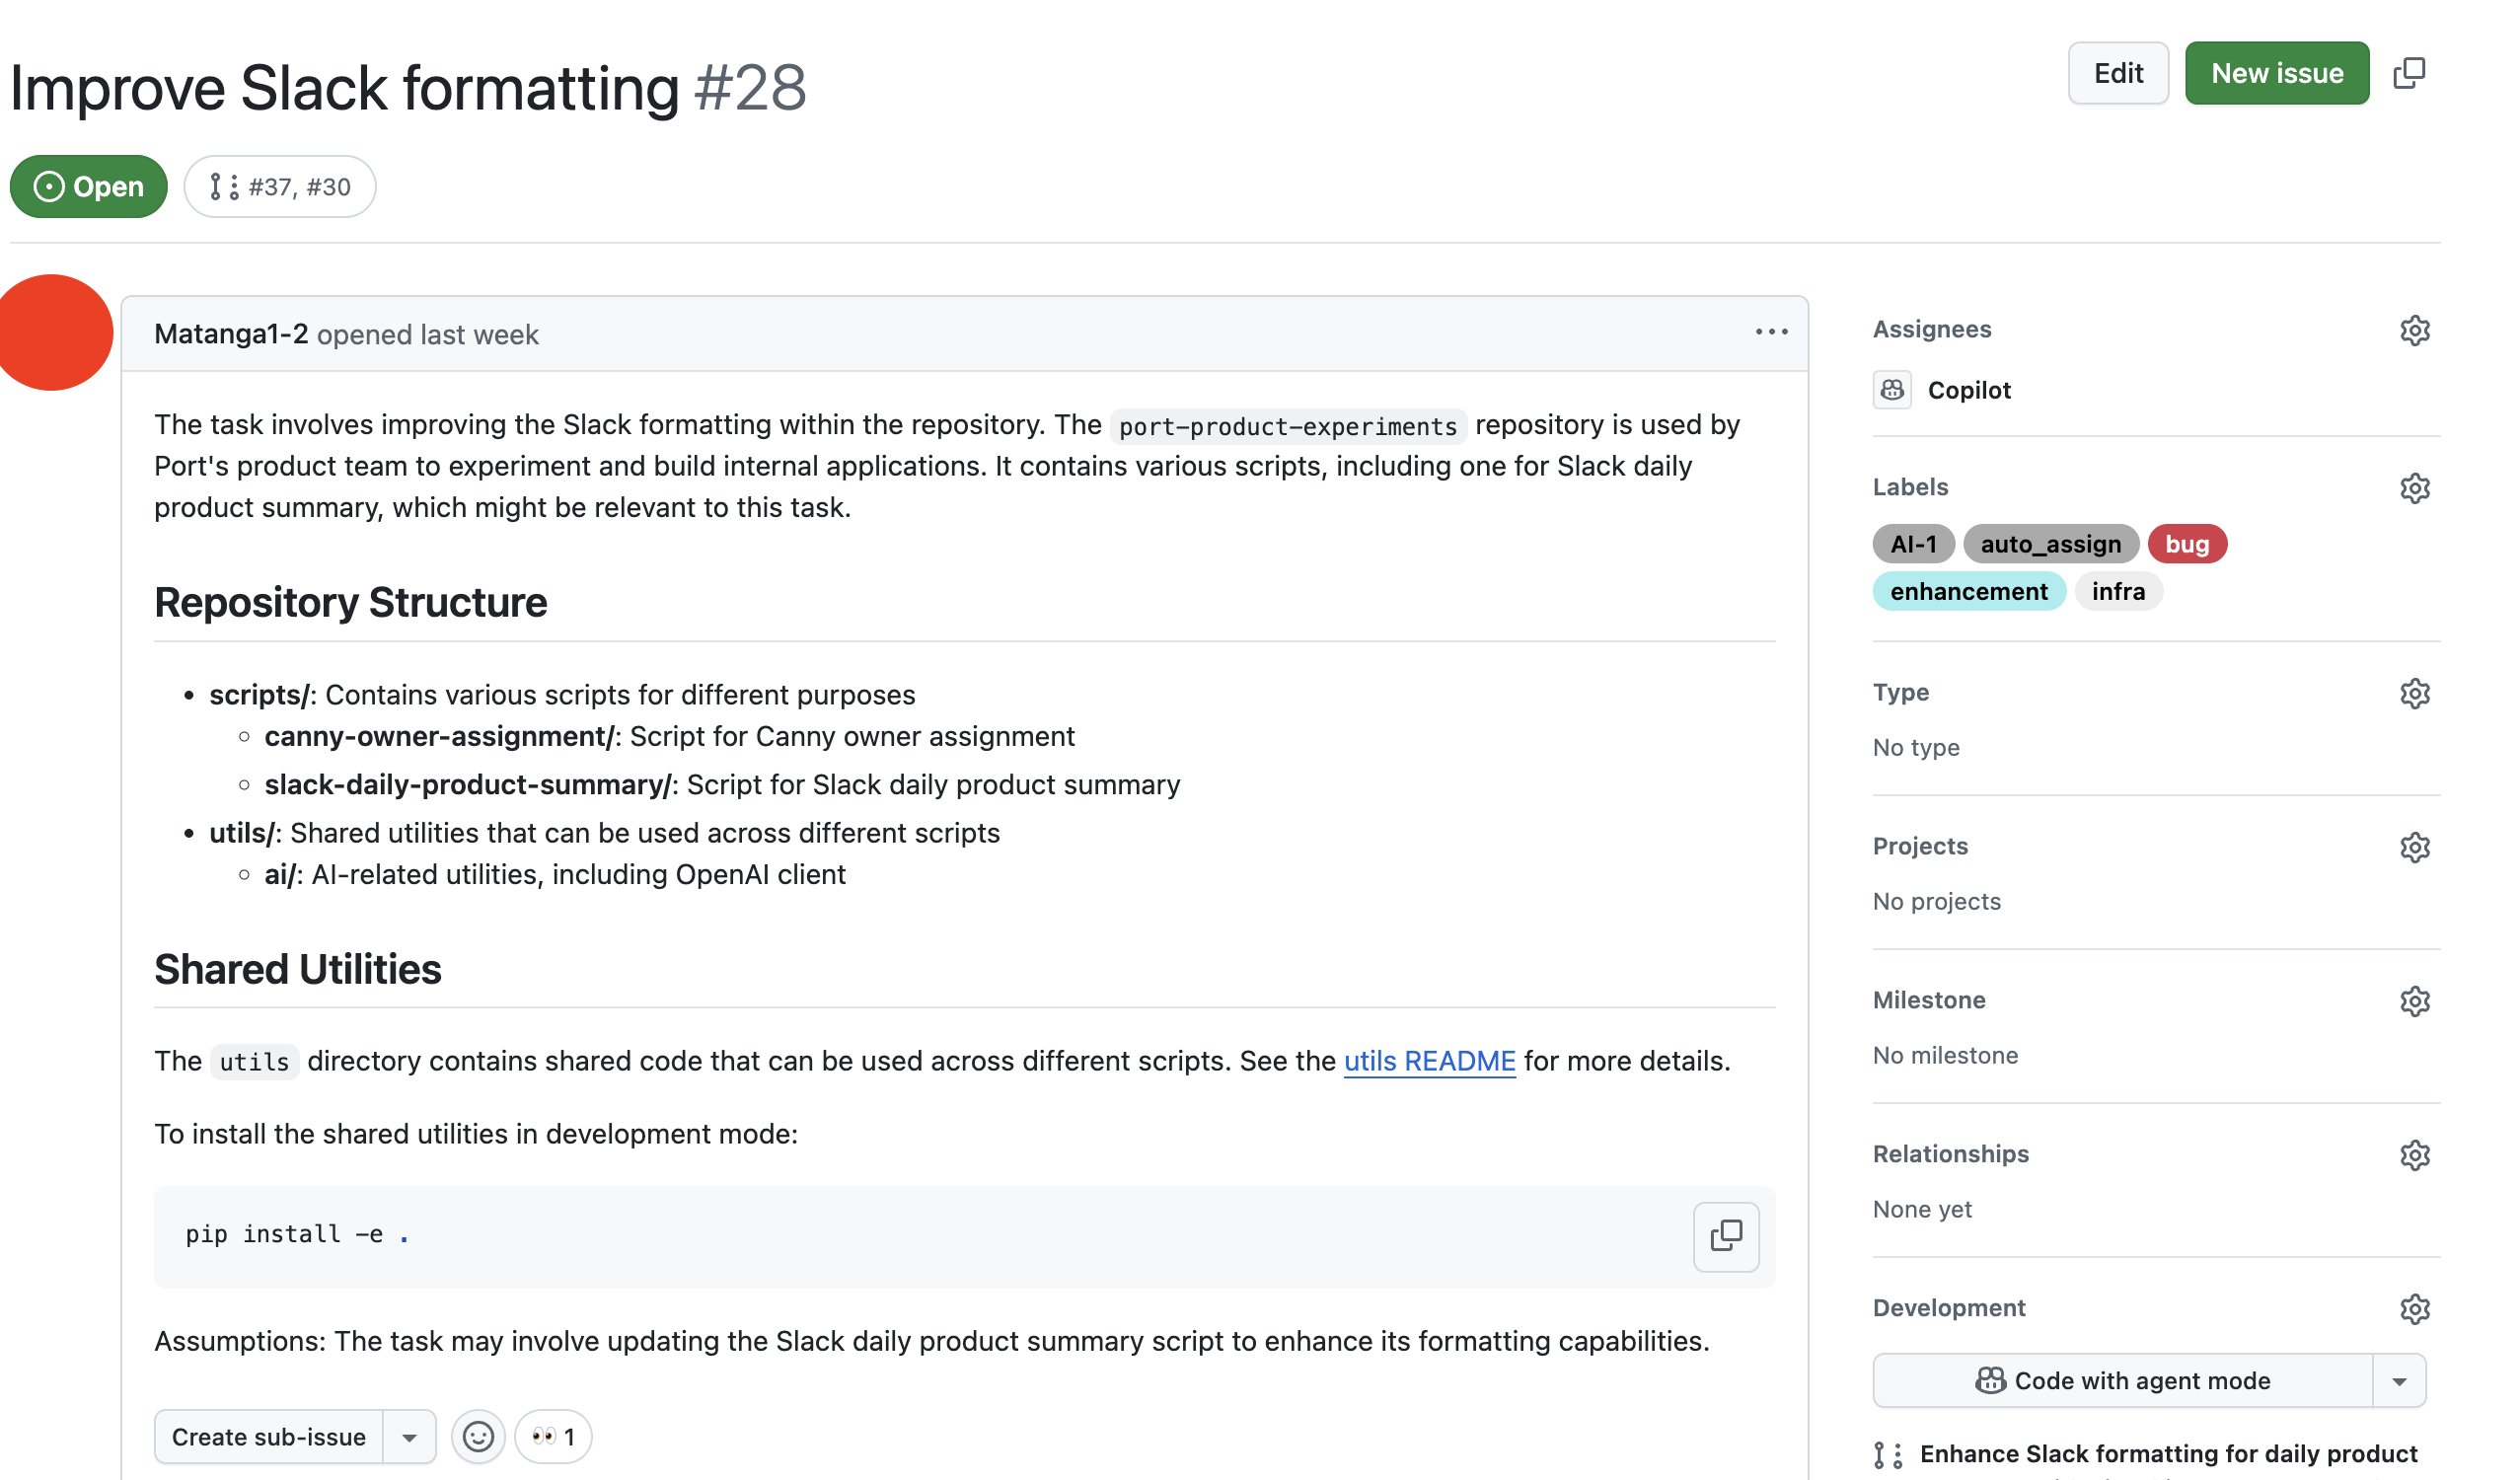
Verify the GitHub issue creation
- Go to your GitHub repository.
- Verify that a new issue was created with the appropriate title, description, and labels.
- Check that the issue has the "auto_assign" label.
Test pull request linking
- Verify that the GitHub issue is automatically assigned to Copilot.
- Confirm that a pull request is automatically created with a title containing the Jira ticket key.
- Check the Jira ticket to see if a comment was added with the PR link.